Thursday, February 11, 2016

Sew Yourself Some Love (Round 2)


SYSL: Sugarplum Cuties

Me again!  Back at it on the Sew Yourself Some Love tour, and I'm super excited for this one!  If I'm being real, 95% of my life is spent at home with my kids.  I'm usually barely awake, drinking coffee, gathering books and activities, reading to my kids, homeschooling, potty training, cooking, cleaning, and doing all the other glamorous mommy things every single day of my life.  Mostly, I don't wear real people clothes.  That said, I'm tired of the same pair of black lounge pants and random 5 year old t-shirt so super worn with holes and stains from painting the house.  I'm convinced that it's entirely possible to wear lounge clothes and still feel like you're making an effort.  I want my husband to come home to the woman he married rather than some shriveled existence of her.  So, I decided to do something about that frumpy "mom wardrobe" and I challenged myself to make something comfortable and cute.


I knew Patterns for Pirates Boyfriend V-neck Shirt was going to be an awesome foundation.  I have a gazillion other Patterns for Pirates sewing patterns so I already know what to expect as far as fit and how her patterns are put together.  The first v-neck I made was actually my muslin.  I always need to add about 2'' to shirt patterns, and I never know how it'll turn out.  I'm 5'8'', so I'm taller than the average bear.  I used some super thin (i.e. cheap) random navy jersey I found in the sewing room thinking it would be a throw away.  I was wrong.  I love the loose fit of this shirt, and how it drapes!


So, I went even further and decided to personalize my top even more.  I designed this graphic and used my Silhouette Cameo to cut it out and iron it on!  Now, I've got a snarky little tee that makes me happy whenever I walk by the mirror.  I can make my hundreds in my sewing room while wearing this tee and maybe one day I'll be able to upgrade to the "thousandaire" shirt. :)  And guess what?! I made a coupon code just for the SYSL blog tour readers so you can make your own snarky tee shirts.  Head to my Etsy shop where you can get 20% anything at all using the code "SEWLOVE."  Yippee!

Sugarplum Cuties: Boyfriend V-Neck


I loved my first v-neck so much that I made another one.  This time, out of some Ponte Knit from Girl Charlee.  I'm a sucker for every single floral fabric I've ever seen, and this one with the coral and black is so cute!  I'm dreaming so hard of spring right now, and I can't wait to wear these colored jeans for real.  The pattern includes two different neckband techniques, and I tried them both to see which one I liked better.  I also love the sleeve length options, and the option to add a cute little pocket to the shirt too.

Sugarplum Cuties: Portlander Pants


I paired my navy bf v-neck with these FANTASTIC Terra's Treasures Portlander Pants.  In my opinion, all of Terra's patterns are seriously underrated.  She creates high quality patterns that result in such wonderfully fitting clothes.

Sugarplum Cuties: Portlander Pants


These pants have an option drawstring that you can add (I skipped it because I didn't have anything on hand).  The waistband is a simple fold over (or not if you want more tummy control).  I made no mods to these pants at all.  The fit is snug around my booty and upper thigh with an awesome flare out down below the knee.  I made mine out of a french terry for optimum comfort, and I just love the way they're fitted and not sloppy looking.  I've got plans for more Portlanders ASAP.  I can totally see them at the pool or even in a stretch linen-look fabric for the spring and summer.  Nothing like some easy pants to round out your closet.

Here are all of the pattern details

Patterns for Pirates Boyfriend V-Neck

  • XXS-XXXL
  • Semi-fitted
  • Short Sleeve, 3/4 roll up with button tab sleeve, and long sleeve (with or without cuffs) options
  • Shirt and tunic lengths
  • Shirt pocket option
  • 2 different tutorials on doing the v-neck band
  • Tips and tricks for sewing with knit fabrics
  • XXS - 3X
  • Fitted through the booty and upper thighs, flared at the knee
  • Tall control panel waistband (can also be folded down like a yoga waistband)
  • Drawstring option
  • Lengthen and shorten lines and tutorials
  • If you join Terra's Facebook Group there's a special code for $3 off!

Thursday, February 4, 2016

Sew Yourself Some Love


I am so super excited to be a part of the Sew Yourself Some Love blog tour this February.  Honestly, I use every opportunity to sew new things for myself, and my closets show some serious evidence of a fabric and sewing addiction.  (Please tell me I'm not the only one).  I just love sewing things for myself.  I feel accomplished and new when I'm wearing the things I make, and as a homeschooling mommy, feeling clean and fresh is something that is to be cherished.  I'm a wife to a military man who is gone often, and giving so much to my kids' education and basic needs everyday is e.x.h.a.u.s.t.i.n.g.  I often find myself saving that perfect fabric for my kids or for some future just in case project and I've really been giving myself permission lately to just use those prized fabrics on myself and stop staring at them sitting on the shelf getting no use.  I might not need new clothes (not even close), but I want them and they make me feel like an actual person, so darn it, I'm sewing me!

Sugarplum Cuties: Denver Tunic


This is my first of 2 posts on this blog tour!  For my first stop, I chose to make the Denver Tunic & Dress by Blank Slate Patterns.  This is my first Blank Slate pattern, and really I'm not sure why I waited this long to try one.

Sugarplum Cuties: Denver Tunic


I found this black jacquard fabric in the red tag section for 50% off.  In the end, I got it for around $5 a yard.  It's got a pretty awesome texture (almost quilted but not) to it and it's really warm.  I kind of love it.  I went back and forth on going simple and classic for the Denver or going with prints and color.  In the end, I chose a more streamlined look because I need more basics in my closet, and I wanted the shapes of the pattern to really shine here.

Sugarplum Cuties: Denver Tunic


I think the stars of this pattern are clearly the princess seams and the fabulous pockets.  I did the fitted tunic length here and sewed up the XS according to my measurements.  I'm 5'8'', and because I didn't add length, this one fits more like a longer shirt rather than a tunic.  It fits exactly how I wanted it to.  I actually bought enough fabric to make 2 in case the first one ended up being more of a muslin, but I didn't need it.  This is the first time I've sewn princess seams for myself, and I really love the way they fit my shape and make me look more feminine.  I just slapped some booties and some skinny jeans on and wore this out looking way more put together than I actually ever am.

Sugarplum Cuties: Denver Tunic

For my next Denver, I'm going to use all those awesome panels and seams to my advantage and do some cool colorblocking.  I also love the casual spring/summer looks you can create with this one, and the fact that there are plenty of sleeve, length, and fitted or flared options.  This is seriously a great staple piece in my wardrobe now, and it's easy to dress up for going out with the husband or dress down for schlepping kids around town doing errands.  And who doesn't love pockets?!

Sugarplum Cuties: Denver Tunic


The Denver pattern is very professional and well written.  There are plenty of tips and instructions on altering the pieces to get a custom fit if you're in between sizes.  There are also sewing tips when working with more challenging knits, and even a couple of different options which have you ending up with enclosed seams. The PDF file also has bookmarks embedded it in so you can quickly jump to different pages.  In fact, there's so much stuff in this one pattern that I wasn't expecting, and things that I haven't seen in other patterns I've used.

Sugarplum Cuties: Denver Tunic

Denver Tunic & Top Pattern Details:

  • Tunic/Dress Length
  • Cowl Neck/Flat Neckband
  • Fitted/Flared Dress or Peplum
  • Princess Seams
  • Pockets
  • Instructions on a Full-Bust or Small-Bust Adjustment
  • Lengthening and shortening instructions
  • Adjustments for waist/hip measurements
  • Tips for sewing with knits
  • Different finishing options

You've gotta check out all the other stops on the Sew Yourself Some Love tour, and make sure you come back here again on February 11th and see what else I've made for my second go around!

Join us through the whole blog tour and don't miss a day!!!

Saturday, January 30, 2016

Pattern Review: Terra's Treasures Girls Lisse Hoodie

Sugarplum Cuties: Girls Lisse Hoodie

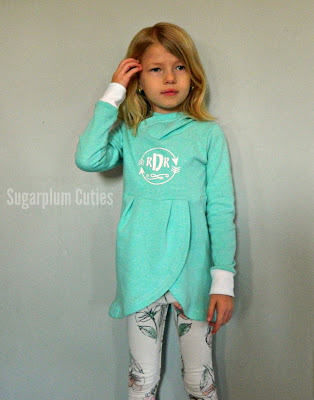
This past week has been a busy one in  my sewing studio.  Among other stuff, I got to test the newest Terra's Treasures pattern, the Lisse Hoodie for girls.  Terra also has a Lisse for women as well you can find it here.  (Hello mommy & me outfits).  Rylea is tiny so I did a size 4 for her and lengthened it to a size 6.  This pattern was super easy to adjust to fit her teeny tiny measurements. :)

Sugarplum Cuties: Girls Lisse Hoodie

The pattern calls for thicker stretch fabrics with 35% stretch so I used a mint colored french terry I found at JoAnn Fabrics last week.  (Side note: make sure you prewash, mine shrunk a good bit when I did).  The fabric choice was perfect for us for the winter and it makes for a super cozy shirt.

Sugarplum Cuties: Girls Lisse Hoodie


I'm always looking for more unique shapes and styles of clothing in the patterns I buy.  I don't need 4 different hoodie patterns that are slightly different from each other.  I want a pattern that has a completely unique shape, and the Lisse is exactly that for me.  The petal shaped opening at the hem is such a sweet and girly detail, especially with those two pleats in the front.  It also really allows for optimum range of movement (which is super important with young kids).

Sugarplum Cuties: Girls Lisse Hoodie

We chose to sew up the hoodie option but there is also a cowl option and you can add a drawstring in either as well or skip it like we did.  I love the crossover hood!

Sugarplum Cuties: Girls Lisse Hoodie

And, since the bodice is such an awesome blank canvas, it gave me some great space to design a monogram and press it on there.  You can find more of my graphic designs in my Etsy shop if you want to take a gander.


Rylea loves her new hoodie and I love it too!  I'd highly recommend hopping over to the website and grabbing this pattern while it's on sale for the release.  You can find the pattern here where it's on sale for just $7 through Feb 1.  The Lisse for Women is also on sale too, so you can grab them both!  Here are the details:
  • Sizes 6months - 16y
  • Hood and Cowl options
  • Drawstring option using eyelets or buttonholes
  • Regular Cuffs or Thumbhole Cuffs
  • Finished Measurements Chart
  • Instructions for lining the hood/cowl

Friday, January 15, 2016

Pattern Review: Sofilantjes Hibernis Cowl Shirt

Sugarplum Cuties: Hibernis Cowl Shirt


This past week I've been in testing for this super cute new shirt from Sofilantjes. I've never tested for Anne before, but I was part of her blog tour a little while back so I already knew what her patterns were like, and that she's a wonderful person to work with behind the scenes.  This pattern is on sale for just $5 for the next two days and you can grab one here!

!!!!!!!!!!!!!!!!!!!!!!!!LISTING PHOTO HERE!!!!!!!!!!!!!!!!!

I jumped on the tester call as soon as I saw it posted.  You had me at princess seams and unique pockets; add in that big cowl and those shoulder tabs, and I'm so in.

Sugarplum Cuties: Hibernis Cowl Shirt


I was chosen to test and given option A (no pockets or princess seams) with short sleeves and the cowl.  I was a little nervous about the cowl because Rylea gets weird about scarves sometimes and I thought she'd hate it.  I was totally wrong.

Sugarplum Cuties: Hibernis Cowl Shirt


Not only does she love the cowl, but she's been wearing it with other shirts (thanks to those tabs that snap and unsnap), and she's been wearing it as a headband too because she's weird sometimes.

The trickiest thing about sewing my shirt up was the cowl.  Thankfully, Anne included written instructions, line drawings, photos, and a video all for that one part of the tutorial.  I had no problems with my cowl at all and the end result is very professional.

Sugarplum Cuties: Hibernis Cowl Shirt


I've got some super awesome fabric that I've set aside for another Hibernis for my girl.  This time we're going to do those fabulous pockets and seams!  I'm guessing there will be a million little Shopkins and Lalaloopsy Dolls hiding in there.

Sugarplum Cuties: Hibernis Cowl Shirt

The Hibernis Cowl Shirt is now ON SALE but only for 2 days so grab it now or you'll be kicking yourself later.  I highly recommend this pattern, and I'm looking forward to seeing all the awesome creativity in Sofilantjes group!

Sugarplum Cuties: Hibernis Cowl Shirt

Details:

  • Sizes 12m - 14y (80 - 164) 
  • Dutch and English versions
  • Layered pattern pieces
  • Line drawings/pictures/video tutorial
  • A4 and letter size trimless pattern pieces
  • View A: princess seams and pockets
  • View B: no pockets
  • Make the cowl with tabs or without
  • 3 different sleeve lengths (short, 3/4, long)
  • Banded hem

Thursday, August 27, 2015

Silhouette Vinyl Projects

So, I've conquered the heat transfer vinyl cutting and heat pressing and all that good stuff, so I figured it was time to conquer a different kind of vinyl.

I was doing the dishes the other day and I broke a glass.  I'm notorious for that, and I'm the reason we don't have nice things.  I'm a glass/bowl/plate breaker.  No joke.  Turns out the glass I broke was one of my husband's favorite from college.  Perfect.

So, when we were grocery shopping the other day, I found these giant red "party cups" in the college dorm section (we live in a D1 college town) for only $.88.  I figured I'd use it for my first vinyl project and try to save face at the same time.


I had my kiddos write their names in black marker on a white sheet of computer paper, then I scanned the images in and traced them in the Silhouette Design Studio.  I created a cute "Best Daddy Ever" image and cut it all out with my machine.  Cleaned the cup with rubbing alcohol so it would be lint and dirt free and slapped it all on there.  Pretty easy!


I was feeling brave and decided to try a project for the house next.  I downloaded this arrow circle frame thing from the Design Store, and added the text and another arrow in the middle, and I put the whole thing on our front door.  It might be obnoxious, but hey, we're awesome AND obnoxious.


Now, I need to #vinylallthethings in my house!  What to do next....

Friday, July 10, 2015

Tutorial: Instagram Photo Wall


We all have it, a bare wall in the house we just haven't gotten around to decorating yet.  You know the one.  We've lived here over a year now and I'm still working on getting the house in order.  I have 3 kids that I homeschool, a husband that's frequently away from home between military duty and his full time job, and very little spare time.  So, I need things to be fast, easy, and effective.

I was online printing some pictures for our master bedroom when I saw that Walgreens had 50% off all prints and they also offered photo printing from Instagram.  Sweet.  I settled on 25 different pictures from my Instagram account and had them printed in the 4'' x 4'' size.  I had no clue what I was going to do with them, and no clue where to find 25 different 4'' x 4'' frames either.  So, here's what I did.

What you'll need:

  • 1 foam paintbrush
  • 1 small jar mod podge (I used the matte finish)
  • 1 or 2 sheets of black foam board (I got mine at Hobby Lobby at 40% off it was less than $2)
  • 4'' x 4'' pictures
  • Ruler
  • x-acto knife


1. First, I grabbed my foam board and cut it into 6'' x 6'' squares.  I used my ruler to mark out all my lines and then I cut them with my x-acto knife.  Like buttah.


2. Then, I grabbed my mod podge and my foam brush and slathered a little bit in the middle of one of my foam board squares.


3. You can measure this part but I'm a rebel and I just eyeballed it and centered my picture in the middle of my foam square.  Then, I painted another layer of Mod Podge right over the top of the picture and the entire square.  Make sure all your brush strokes are going in the same direction.  The glue will dry clear but you'll still be able to see the brush strokes from certain angles.


4. Once the glue turns from white to clear, it's dry.  It doesn't take long, maybe 30 min or so depending on how thick a layer you used.

5. Repeat as many times as needed!


I hung all my pictures up on a wall that borders the stairs.  I used small 3M tape strips cut in half (because I'm cheap and these foam squares are really light). I used the level app on my iPhone to make sure the first row of pictures were straight and then I just eyeballed it from there.  Start in the middle and work your way out to the left and then to the right and you'll be good to go.  Easy peasy!


P.S.  While I would love to be one of those bloggers that's fancy and sponsored by big companies, alas, I am not.   I received no compensation for this post.  But, if you're Walgreens and you want to send me free things, I accept. Thankyouverymuch

Wednesday, May 27, 2015

Summer Surprise Anniversary Tour: Pattern Hack & GIVEAWAY!

Hi and welcome to my stop on the Summer Surprise Tour! Happiest of anniversaries to Sofilantjes and Anne; we know we're going to see many many more awesome things from you this coming year.
 

A part of the anniversary goodness, Anne is re-releasing her Summer Surprise pattern with an all new layout.  The pattern now includes the layers feature which is so easy to use and saves ink and paper when printing all your patterns, it's really a fabulous addition to an already fabulous pattern.  Don't forget to download your update if you already own the pattern and if you don't, keep reading for a coupon code!

 My girl is a very slim 6 year old.  She has the chest measurement of a 3T and the height of a 6T.  Anne has drafted regular and slim sizes (both included in the same pattern download) so I chose to do a slim 3T on my girl.  Perfect fit!

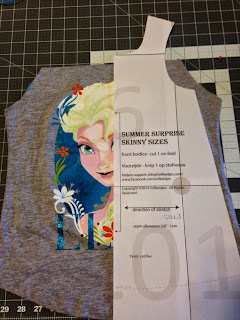
As you may (or may not) know, I'm an upcycler by trade.  I take tee shirts and turn them into something else.  I've made dresses, pants, skirts, shorts, you name it.  So, I stayed true to form here and turned one of my girl's favorite Elsa tees into a dress for her.  Here's how I did it.

I started with my tee and my front pattern piece all assembled and ready to go. I also grabbed my sharpie (because I like to live dangerously), and scissors.


Cut the sleeves off the shirt and cut the front of the shirt away from the back.


Then, once I laid my pattern piece on top of my shirt, I realized I was going to need more fabric added to the panel to make it work.  I added an extra strip of solid blue to the top to give the shoulders some color. I just measured how much more fabric I'd need and, considering seam allowances, I rough cut piece from my scraps and serged it on.

Then, once my panel was large enough, I laid my pattern piece on top, traced it, and cut it out.  Easy peasy.  I did the same thing for the back as well, and I had myself a cute little color blocked dress.


I kept the curved hem of the tee in tact and used that as the hem of her dress.


Pair the dress with some mommy-made leggings and you've got a winner!

And now, for the good stuff!  Use the code "anniversary" to get 25% off the Summer Surprise Tunic & Top!  And enter the giveaway below!  There's a new one everyday so make sure you visit all the bloggy stops on the tour and enter them all :)  Happy sewing!


a Rafflecopter giveaway

Related Posts Plugin for WordPress, Blogger...